Last time: overview of a project to set up a webserver with Let’s Encrypt on Google Compute Engine.
My website is still old-style. It runs on a Linux server with Apache. So step one is getting a server using Google Compute Engine. You can use any other cloud or hosting service that offers an acceptable version of Linux if you don’t want to use Google.
Go to console.cloud.google.com and log in with a Google account. If you’ve never used any Google Cloud Platform services before you’ll have to agree to some terms right away. Google changes the layout of the console all the time, but there should be a menu on the side that has Compute Engine as a choice. Click that, and you’ll immediately be given the chance to Create a project:

Create a project start screen
Pick any name you want (I used home-page) and click Create. You’ll be told to set up a billing account if you don’t have one. On a new account you should be given an offer to try Cloud Platform for free by accepting the terms, and then fill in payment information. You shouldn’t actually get charged anything for the things we do here, but once the account exists and the free trial expires or is used up you could choose to use paid services, so Google requires you to set up payment.
After a minute or two, your account will be activated and you can get started. Click VM instances in the menu on the left, and then the Create button in the middle of the page.
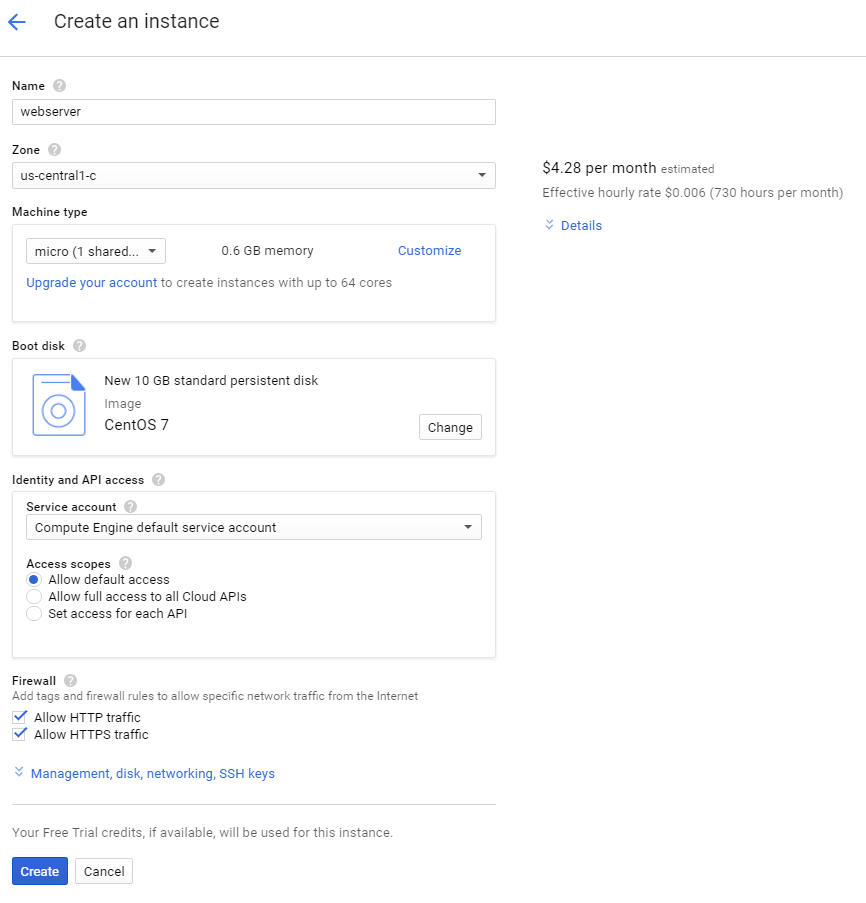
Now you can fill in details of the instance type you want. I named mine webserver, more or less randomly picked the us-central1-c zone (which is in Ohio) with a micro machine type, and chose a 10 GB CentOS 7 boot disk. I picked CentOS 7 because it’s well supported by certbot, which I’ll use to get my server certificate later. I’ll also checked the boxes to allow HTTP and HTTPS traffic. When all is ready, the page looks like this:
Click Create, and Compute Engine starts setting up your new server. In a couple of minutes, you should see a green check mark indicating your server is up and running:

We’re just about done with this first step, except for the important question of just how we connect to and use this server. We can try using SSH on the command line to connect to the External IP, but what are the credentials we need?
Google actually makes connecting very easy. The Connect column is a drop-down menu, and one of the options is Open in browser window. Select that, and Google creates an SSH key pair for you, pushes the public key to the server, and opens an SSH terminal session in your browser. It couldn’t be easier. We can use this shell to configure Apache and certbot over the next two posts.
If you prefer to use your own SSH client, the drop down menu will take you to instructions. I thought that would be my preference, but it turns out I prefer the browser client or the gcloud command line. Either of those options handles SSH key pairs for you automatically, which is handy. The gcloud command line also makes it easy to transfer files to and from your instance as well as connect to a shell.
Next time: installing and configuring Apache web server.

[…] web server for our site. The first step is using the cloud console to SSH to the server as shown in the last post. Once there, we will use the yum package manager to install the web server, as shown […]
Pingback by Setting up Apache Web Server | Charles Engelke's Blog — March 19, 2017 @ 9:08 pm