I wrote a couple of posts last fall looking into working with X.509 certificates. Doing so requires a lot of very detailed, complicated bit and byte twiddling, and as a result I got so discouraged I went nearly four months without posting again. But I’m ready to tackle it again.
What’s changed? I found the PKIjs and ASN1js JavaScript libraries from GlobalSign. They are built on top of the Web Cryptography API and deal with the painstaking work of handling ASN.1 data and the various PKI related standards so I don’t have to. They are also from a company that has been working with these technologies for almost 20 years, so I have a lot more confidence that their code is doing it right than I would with new code I wrote. The author of the library is Yuri Strozhevsky (Юрий Строжевский). I’ve been in touch with him and he’s very knowledgeable and helpful.
I used the PKIjs library along with web crypto to create self-signed X.509 certificates. Having certificates signed by a separate CA would involve the same steps, just using a separate private key for the final signing. I found using the PKIjs library to still be fairly difficult, mainly because of the innate complexity of the X.509 standard. It also looks like it’s structured for a strongly typed language, not a dynamic one like JavaScript.
What the User Sees
Since it’s tricky to use, I’m going to go over the example in this post. Here’s what the web page looks like when it’s first opened:

The user will enter the identifying information needed for the certificate, click a button, and then see the PEM forms of the created certificate, public key, and private key, along with download links for them. Source code for this example is available on GitHub, and you can try out a live version, too.
Application Structure
The JavaScript waits for the page to be loaded, checks to see that the needed API is available, and attaches a click listener to the button. In addition, there is new code that checks for the API being available under Apple’s window.crypto.webkitSubtle prefix instead of window.crypto.subtle, and points window.crypto.subtle at that if needed. However, Apple Safari’s implementation of the API is still not complete, so this example won’t work there as of March 2015.
document.addEventListener("DOMContentLoaded", function() {
    "use strict";
    if (window.crypto && !window.crypto.subtle && window.crypto.webkitSubtle) {
        window.crypto.subtle = window.crypto.webkitSubtle;
    }
    if (!window.crypto || !window.crypto.subtle) {
        alert("Your browser does not support the Web Cryptography API! This page will not work.");
        return;
    }
    document.getElementById("create-certificate").addEventListener("click", createCertificate);

    // Click handler and helper functions go here
}
The click handler is fairly simple: get and check the input fields, then generate a key pair and use it to build a self-signed certificate. The general structure follows:
    function createCertificate() {
        var keyPair;
        var commonName       = document.getElementById("common-name").value;
        var organization     = document.getElementById("organization").value;
        var organizationUnit = document.getElementById("organization-unit").value;
        var countryCode      = document.getElementById("country-code").value;
        if (!commonName) {alert("You must enter a name for the certificate."); return;}
        if (countryCode.length !== 2) {
            alert("Country codes must be two characters long."); return;
        }
        countryCode = countryCode.toUpperCase();

        // Chain of promises that does all the work goes here
In plain language, the chain of promises does the following:
- Create a new RSASSA-PKCS-v1_5 key pair for the certificate
- Save the key pair in keyPair for later reuse
- Create a PKIjs certificate object with the input fields and the key pair
- Convert the certificate object to PEM format and insert it into the page. Also export and convert the public and private keys to PEM and insert them in the correct parts of the page.
In JavaScript, that turns out to be:
        window.crypto.subtle.generateKey(
            {
                name: "RSASSA-PKCS1-v1_5",
                modulusLength: 2048,
                publicExponent: new Uint8Array([1, 0, 1]),
                hash: {name: "SHA-256"}
            },
            true,   // Must extract private key to create PEM files later
            ["sign", "verify"]).
        then(function(newKeyPair) {
            keyPair = newKeyPair;
            return keyPair;
        }).
        then(function(keyPair) {
            return buildCertificateObject(commonName, organization, organizationUnit, countryCode, keyPair);
        }).
        then(function(cert) {
            // Convert everything to PEM and insert into page
        }).
        catch(function(err) {
            alert("Error creating certificate: " + err.message);
        });
The only new things here are the buildCertificateObject call and the steps to convert everything to PEM to place into the page.
Building the Certificate
The heavy lifting is all done inside buildCertificateObject:
    function buildCertificateObject(commonName, organization, organizationUnit, countryCode, keyPair) {
        var cert = new org.pkijs.simpl.CERT();

        setSerialNumber(cert, Date.now());
        setSubject(cert, countryCode, organization, organizationUnit, commonName);
        setIssuer(cert, countryCode, organization, organizationUnit, commonName);
        setValidityPeriod(cert, new Date(), 730);  // Good from today for 730 days
        setEmptyExtensions(cert);
        setCABit(cert, false);
        setKeyUsage(cert, true, true, false, false, false, true, true); // digitalSignature, nonRepudiation, keyCertSign, cRLSign
        setSignatureAlgorithm(cert, "1.2.840.113549.1.1.11"); // RSA with SHA-256

        return setPublicKey(cert, keyPair.publicKey).
            then(function() {return signCert(cert, "1.2.840.113549.1.1.11", keyPair.privateKey)}).
            then(function() {return cert});

        // Helper functions go here
    }
The function starts by creating an empty org.pkijs.simple.CERT object, and then it fills in the information needed in the certificate: serial number, subject (the person holding the certificate), issuer (same as subject for the self-signed certificate), validity, extensions for certificate authority and key usage, and the code for the signature algorithm. It finishes by setting the public key portion of the certificate (which requires exporting the public key created earlier, so is a Promise), then signing the certificate, and passing the signed certificate on to the following then method.
The serial number is any number, but should be unique for each issuer. This code uses the number of milliseconds since January 1, 1970. Unless we issue two certificates within a millisecond of each other, this should guarantee uniqueness.
The subject and issuer are identified by a variety of strings including the common name and country code. Organization and organizational unit can also be provided.
The validity period is the first and last times the certificate is valid. The code sets them to the current day and 730 days later.
Certificate extensions are optional, but we are using two of them here: one to state that this certificate should not be used by a certificate authority, and another saying that the certificate can be used for four specific purposes out of seven that can be listed. However, lots of programs ignore the restrictions, so you can’t count on the certificate not being used for other purposes.
The signature algorithm is the object identifier (OID) of the algorithm that this certificate was signed with. The key was created for RSA with SHA-256, so I looked up the registered OID for that and got 1.2.840.113549.1.1.11.
Using PKIjs
I’m not going to show the bodies of all of the helper functions called here. They pretty much just translate the high-level operation being done (such as setting a country code) into the specific operations provided by the PKIjs library. Full source is available on GitHub, and I’m sure the examples will be useful to anyone using the library.
The first helper function sets the serial number:
        function setSerialNumber(cert, serialNumber) {
            cert.serialNumber = new org.pkijs.asn1.INTEGER({value: serialNumber});;
        }
It just sets the appropriate property of the certificate object to an object that represents an ASN.1 INTEGER object. The setEmptyExtensions function is even simple: it creates an extensions property and initializes it to an empty array:
        function setEmptyExtensions(cert) {
            cert.extensions = new Array();
        }
Other functions are more involved, requiring creation of complex objects to insert in the certificate. For example setting the CABit to the boolean value provided requires adding an EXTENSION object to the cert.extensions array. One property of that new object is itself a complicated object, an x509 BasicConstraints object. I could not figure this out from the documentation; I had to see some examples included in the PKIjs library and copy them:
        function setCABit(cert, isCA) {
            var basicConstraints = new org.pkijs.simpl.x509.BasicConstraints({
                cA: isCA,
                pathLenConstraint: 3
            });

            cert.extensions.push(new org.pkijs.simpl.EXTENSION({
                extnID: "2.5.29.19",
                critical: false,
                extnValue: basicConstraints.toSchema().toBER(false),
                parsedValue: basicConstraints
            }));
        }
One thing you’ll see when exploring the full source is the tedious detail that needs to be handled. That’s the nature of X.509 and there seems no way around it. At least the PKIjs library handles all the complex ASN.1 building and encoding for us. It’s an enormous help.
Converting the Results to PEM Format
Once the certificate has been created and signed, the code needs to convert into PEM format, a plain text rendering of the binary data. Building that requires converting the JavaScript certificate object to a binary encoded ASN.1 object, using cert.toSchema(true).toBER(false). That binary data needs to be converted to the plain text PEM format and inserting a standard header and footer line. Once that’s done we can insert the text into the web page, and prepare a download link using a data URI:
            var pemCert = convertBinaryToPem(cert.toSchema(true).toBER(false), "CERTIFICATE");
            var pemUrl = "data:application/octet-stream;charset=UTF-8;base64," + btoa(pemCert);
            document.getElementById("pem-certificate").innerText = pemCert;
            document.getElementById("certificate-download").setAttribute("href", pemUrl);
The public and private keys can also be put into PEM format by exporting them to spki or pkcs8 binary format, respectively, then converting to PEM:
            window.crypto.subtle.exportKey('spki', keyPair.publicKey).
            then(function(spki) {
                var pemPublicKey = convertBinaryToPem(spki, "PUBLIC KEY");
                var pemUrl = "data:application/octet-stream;charset=UTF-8;base64," + btoa(pemPublicKey);
                document.getElementById("pem-public-key").innerText = pemPublicKey;
                document.getElementById("public-key-download").setAttribute("href", pemUrl);
            });

            window.crypto.subtle.exportKey('pkcs8', keyPair.privateKey).
            then(function(pkcs8) {
                var pemPrivateKey = convertBinaryToPem(pkcs8, "PRIVATE KEY");
                var pemUrl = "data:application/octet-stream;charset=UTF-8;base64," + btoa(pemPrivateKey);
                document.getElementById("pem-private-key").innerText = pemPrivateKey;
                document.getElementById("private-key-download").setAttribute("href", pemUrl);
            });
Actually converting a binary ArrayBuffer into a printable PEM string is the job of convertBinaryToPem. That starts by creating a standard header line, then the base64 encoded version of the ArrayBuffer, broken into lines no longer than 64 printable characters each, then a standard footer line. The PEM specification also says that lines should be terminated with CF-LF, not just LF. The code to do this is:
    function arrayBufferToBase64String(arrayBuffer) {
        var byteArray = new Uint8Array(arrayBuffer)
        var byteString = '';
        for (var i=0; i<byteArray.byteLength; i++) {
            byteString += String.fromCharCode(byteArray[i]);
        }
        return btoa(byteString);
    }

    function convertBinaryToPem(binaryData, label) {
        var base64Cert = arrayBufferToBase64String(binaryData);
        var pemCert = "-----BEGIN " + label + "-----\r\n";
        var nextIndex = 0;
        var lineLength;
        while (nextIndex < base64Cert.length) {
            if (nextIndex + 64 <= base64Cert.length) {
                pemCert += base64Cert.substr(nextIndex, 64) + "\r\n";
            } else {
                pemCert += base64Cert.substr(nextIndex) + "\r\n";
            }
            nextIndex += 64;
        }
        pemCert += "-----END " + label + "-----\r\n";
        return pemCert;
    }
The only unusual part of this code is converting the binary data in the ArrayBuffer to a JavaScript string, each character of which contains one byte. That’s done so we can use the built in btoa function for base 64 encoding.
Example Output
Here’s the first part of the page when information has been filled in and a certificate created:
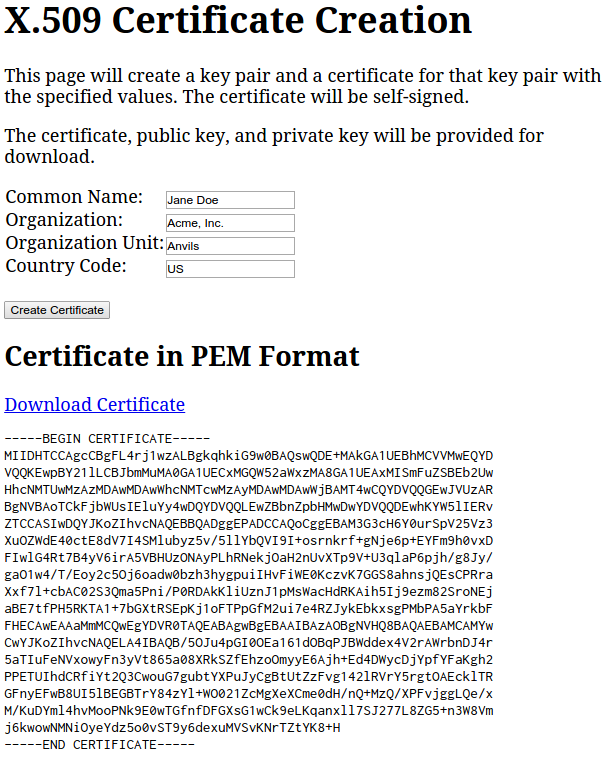
The public and private keys would follow, but didn’t all fit on one screen. I downloaded the certificate and used openssl to display its contents using openssl x509 -in downloaded.cert -inform PEM -text. Here’s a truncated version of what I got:
Certificate:
    Data:
        Version: 1 (0x0)
        Serial Number: 1425411733871 (0x14be128f96f)
    Signature Algorithm: sha256WithRSAEncryption
        Issuer: C=US, O=Acme, Inc., OU=Anvils, CN=Jane Doe
        Validity
            Not Before: Mar  3 00:00:00 2015 GMT
            Not After : Mar  2 00:00:00 2017 GMT
        Subject: C=US, O=Acme, Inc., OU=Anvils, CN=Jane Doe
        Subject Public Key Info:
            Public Key Algorithm: rsaEncryption
                Public-Key: (2048 bit)
                Modulus:
[modulus of public key in binary shown here]
                Exponent: 65537 (0x10001)
        X509v3 extensions:
            X509v3 Basic Constraints:
                CA:FALSE, pathlen:3
            X509v3 Key Usage:
                Digital Signature, Non Repudiation, Certificate Sign, CRL Sign
    Signature Algorithm: sha256WithRSAEncryption
[SPKI format public key in bytes shown here]
-----BEGIN CERTIFICATE-----
[same cert as shown on the page would go here]
-----END CERTIFICATE-----
The various fields we set are all shown here. It looks like we created the certificate successfully. But does this work? Let’s sign a file with the private key and then try to verify it with the certificate. The file is called test.txt, the private key is downloaded.key, and the certificate is downloaded.cert, so we sign it with:
openssl pkeyutl -sign -in test.txt -inkey downloaded.key -out test.sig
There’s no output if it all worked. Then verify it with the certificate:
openssl pkeyutl -verify -in test.txt -sigfile test.sig -certin -inkey downloaded.cert
And we see Signature Verified Successfully.
Conclusion
This pure web application created a key pair and self-signed X.509 certificate for that key pair, and the results are interoperable with OpenSSL. There’s a lot more control you can exercise over the content of the certificate, using the org.pkijs.schema.CERT constructor and related x509_schema.js library, instead of the simple versions used here. But there’s no getting around the need to deal with a lot of exacting details when creating certificates.

Hello Mr. Engelke,
Thanks for this great article.
I want to issue certificates to my API users on my web page too. The article is the one article that tells how to use PKIjs I found.
I know you are interested in Webcrypto.
I use Node.js and there is another library named `pem` that simulates openssl commands on back-end.
[https://github.com/andris9/pem]
But `pem` is used for just issuing certificate yet. It is not contain other things like `ASN.1` and `CRL` operations.
FYI 🙂
Comment by Efkan Türen (@efkanturen) — April 16, 2015 @ 1:10 am